Microsoft Teams Appointment Integration (Technical Guide)
This guide aims to take you through the steps to allow your TARGETconnect users the option to integrate the Appointments feature with your institution's Microsoft Teams platform. While there is a level of ongoing maintenance required from an Operator of the platform, the initial technical integration should only require a one time configuration.

The operator guide (assuming the below technical integration has been completed) can be found here: Teams/Appointments Operator Guide
Configuration Overview

Step 1 - Azure AD/Microsoft Graph Config:

Please scroll down to 'Indepth Technical Guide - Azure AD/Microsoft Graph' for a step by step guidance on this
Facilitate TARGETconnect's integration with your institution's Microsoft Graph service via the Azure app registration portal https://go.microsoft.com/fwlink/?linkid=2083908 following these instructions https://docs.microsoft.com/en-us/graph/auth-v2-service?view=graph-rest-1.0
This will involve registering TARGETconnect to receive administrator consent in order to be granted application-level permissions.
The required permissions are:
- OnlineMeetings.ReadWrite.All
- User.ReadBasic.All

Information regarding what the above permissions do can be found here: https://learn.microsoft.com/en-us/graph/permissions-reference
Step 2 - Microsoft Teams Configuration:
Please note, this next step will need to be completed by a Microsoft Teams administrator for your University. This might be a different person than who completed the first two steps.
A Microsoft Teams admin for the organisation must add application access policy to associate the application created above (identified by application ID) with the users in teams. This is a Teams specific action, that allows an application to act on behalf of the user in creating online meetings. This must be applied to each related account for an Operator that wishes to run appointments, allowing targetconnect to create an appointment where that operator is the Teams Meeting owner. It should only be applied to Operator accounts, not students.
This step can only be done after configuring the enterprise application/service principal. The steps are detailed here: https://docs.microsoft.com/en-us/graph/cloud-communication-online-meeting-application-access-policy
If you have an existing application policy, updating the policy is your best option here. If not, you can follow number 5 on the above link to grant the policy to the whole tenant.
Step 3 - Configure API Permission Restrictions:
Please see indepth technical guide below, detailing how to set the appropriate MS Teams API permissions
Step 3 - Configure API Permission Restrictions:
Please see indepth technical guide below, detailing how to set the appropriate MS Teams API permissions
Step 4 - TARGETconnect platform:
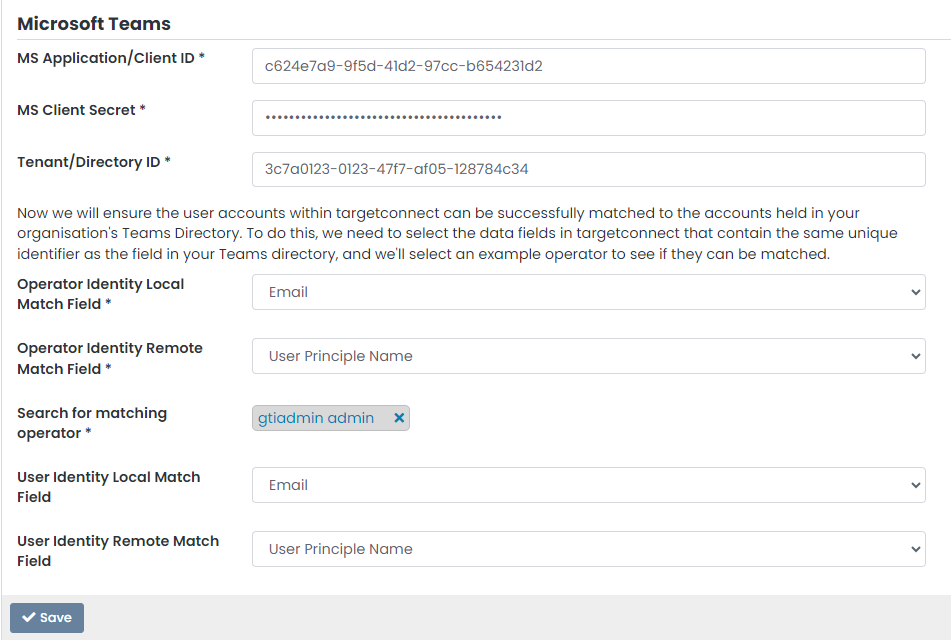
TARGETconnect needs the following fields (from step 1 and 2) that can be directly entered into the Partner configuration page (Maintenance > Partner Configuration)
The IT team will need to know which field within TARGETconnect maps to the Active Directory identifier. This will largely be an email address, but it could be the user principle name, or a unique ID.
- Application ID (step 1)
- Directory (Tenant) ID (step1)
- Client Secret (step 1)
- Operator Identity Local Match Field (your TARGETconnect chosen identifier)
- Operator Identity Remote Match Field (your Active Directory identifier)
- User Identity Local Match Field (your student/user TARGETconnect chosen identifier)
- User Identity Remote Match Field (your student/user Active Directory identifier)
Example:
For any support needs in relation to this step, please contact the TARGETconnect Technical Integration team: targetconnect.integrations@groupgti.com

Please be aware if updating configuration details or verifying different operator accounts are verifying through the tool when you put something in such as to test an operator that is not configured correctly by your IT team, and the operator fails to verify, to make sure you re-run the config with someone who successfully works, due to the failed attempt this will temporarily disable the integration till a successful verification has been saved.
Indepth Technical Guide - Azure AD/Microsoft Graph
1. Login to Azure AD portal at https://portal.azure.com/
2. Select 'App registrations' on the left hand side
3. Create a new 'App registration' and call it 'targetconnectMSTeamsIntegration', then click 'Register' at the bottom (there is no need to specify 'Redirect URI')
4. Note down the Application (client) ID and Directory ID on the next page.
You will need the Application and Directory IDs in order to configure TARGETconnect correctly
5. Click 'Add a certificate or secret'
6. Under the Client secrets tab, click '+ New client secret'
7. Enter the Description and choose an appropriate validity period, then click 'Add' at the bottom
8. Take note of the 'Secret Value'
You will need this value in order to configure the TARGETconnect platform correctly
9. Navigate to 'API permissions' on the left-hand side
10. Click '+ Add a permission'
11. Select 'Microsoft Graph'
12. Select 'Application Permissions'
13. Type 'OnlineMeetings' in the search box and check 'OnlineMeetings.ReadWrite.All' as per the screenshot below
14. Do the same for the 'User.ReadBasic.All' permission
15. Remove 'User.Read' permission (this was created by default)
16. Click 'Grant admin consent for <YOUR ORG NAME>' above and click 'Yes'
17. Make sure that two green checkmarks appeared under the 'Status' column
API Permission Restrictions
1. Install PowerShell Management Module for Teams
2. Connect to MS Teams via PowerShell
3. Create app access policy for the app registration
4. Get User Object IDs from Azure AD - this should be the list of TARGETconnect Operators that want to create meetings - two examples are:
ab70cc80-xxxx-xxxx-xxxx-xxxxxxxxxx - Operator User A
52142546-xxxx-xxxx-xxxx-xxxxxxxxxx - Operator User B
5. Apply the policy to the users, one by one. Only one app policy can be applied to a user. It cannot be applied to groups
Or Apply the policy to everyone who hasn't got a policy applied
6. Check what policy is applied to a user (if it is empty it is a global one)

Only one ApplicationAccessPolicy can be applied to a user. Any previous setting will be overwritten. Take extreme care if your organisation uses these polices!